Impact of Microsoft Security Update Program August 2017 on FX Printer Driver & Fax Driver
Updated on February 23, 2018
In the environment of PC with Microsoft Security Update Program released on Aug. 9th 2017 (Security Update Program August 2017) applied, if you output documents from FX product using FX printer driver or Fax driver, such a failure that outputting cannot be performed normally is confirmed. Also, the same problem occurs with Security Update Program released in September 2017 or later.
We have been proposing the temporary workaround, however, now we would like to announce a release of security program update to fix this problem.
Target Driver
- Multi-model Print Driver 2
- Multi Model Print Driver
- PCL Printer Driver
- HostBase Drivers for IBG listed
Overview of Failure
【Environmental Conditions】
Environment of Windows 7, Windows Server 2008 R2 or later with Microsoft Security Update Program released on Aug. 9th 2017 applied.
However, since the updated Security Program for fixing the problem was released, in the environment of PC with Microsoft Security Update Program February 2018 applied, the problem does not occur. (As for Windows 10 Fall Creators Update, the problem does not occur even in the environment with Microsoft Security Update Program January 2018 applied.)
【Target Driver】
Printer drivers or a Fax driver mentioned above
【Contents of Failure】
When data including image data in a margin area is output for printing or fax, the following problems may occur.
Page is output as a blank page.
Output image is partly missing.
Size of spool data becomes too large to output etc.
Security Update Program to Fix the Problem
The problem can be fixed by applying Microsoft Security Update Program released in February 2018 for each OS listed below. The programs are available at the following Microsoft Web sites.
| Windows 7 | https://support.microsoft.com/en-us/help/4074598/ |
|---|---|
| Windows 8.1 | https://support.microsoft.com/en-us/help/4074594/ |
| Windows 10 Fall Creators Update (Version 1709)Note1 | https://support.microsoft.com/en-us/help/4074588/ |
| Windows 10 Creators Update (Version 1703) | https://support.microsoft.com/en-us/help/4074592/ |
| Windows 10 Anniversary Update (Version 1607) | https://support.microsoft.com/en-us/help/4074590/ |
| Windows 10 November update (Version 1511) | https://support.microsoft.com/en-us/help/4074591/ |
| Windows 10 (Early version released in July 2015) | https://support.microsoft.com/en-us/help/4074596/ |
| Windows Server 2008 R2 | https://support.microsoft.com/en-us/help/4074598/ |
| Windows Server 2012 | https://support.microsoft.com/en-us/help/4074593/ |
| Windows Server 2012 R2 | https://support.microsoft.com/en-us/help/4074594/ |
| Windows Server 2016 | https://support.microsoft.com/en-us/help/4074590/ |
- Note1 On Windows 10 Fall Creators Update, the problem can also be fixed even by applying Microsoft Security Update Program released in January 2018.
How to check the version of Windows 10
If the above Security Update Programs for fixing the problem cannot be applied, use the workarounds provided below.
Workaround 1 (Download of the driver for avoiding failure)
Please download and use Multi-model Print Driver 2 for avoiding failure (Ver.2.7.13 or later) from FX download page (http://fujifilm.com/fb/download/software/mm_prt_drv/).
For using this driver, please read the notes described on “In using this driver” on the above download page.
The driver for avoiding failure prevents failure by evading error occurrence conditions found in our investigation on the driver side.
Workaround 2 (How to set, change and check margin)
The failure can be prevented by changing the top/bottom/right/left margin setting values to 4.2 mm or more.
Following the procedure below, check the print settings. If the margin was not specified or set to 4.1 mm or less, change the value to 4.2 mm or more.
We would like to ask for your understanding in advance that if the margin is set to 4.2 mm or more, some effects may be caused as described later. The actual screen image of driver may be different from that used in the instruction below depending on using model.
【PCL6 Driver Operation Procedure】
- Open the [Device and Printer] window.
- Right-click on a printer icon for printing and click [Printing Preferences].
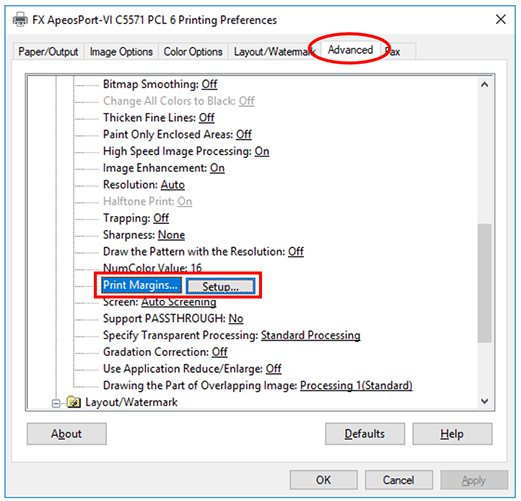
- In the [Printing Preferences] dialog, select [Print Margins] on the [Advanced] tab, and click the [Setup] button which appears then.

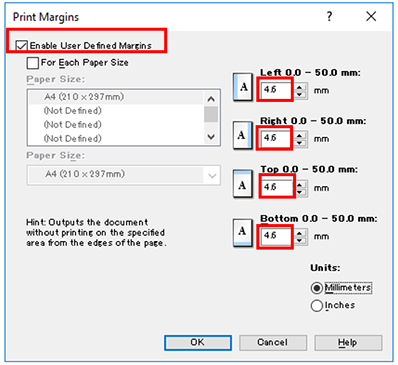
- If the margin was not specified or the top/bottom/right/left margins are set to 4.1 mm or less, switch on the [Enable User Defined Margins] checkbox and change the margin setting values to 4.2 mm or more.

- Close the [Print Margins] dialog by clicking the [OK] button in the dialog.
- Close the [Printing Preferences] dialog by clicking the [OK] button in the dialog.
- Close the [Device and Printer] window.
【Multi-model Print Driver 2 Operation Procedure】
- Open the [Device and Printer] window.
- Right-click on a printer icon for printing and click [Printing Preferences].
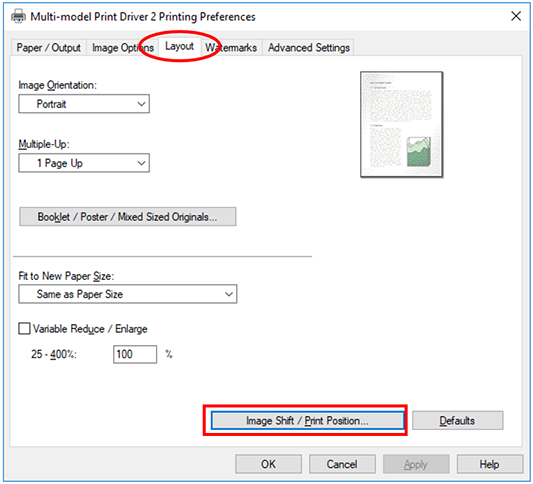
- In the [Printing Preferences] dialog, click the [Image Shift/Print Position] button on the [Layout] tab.

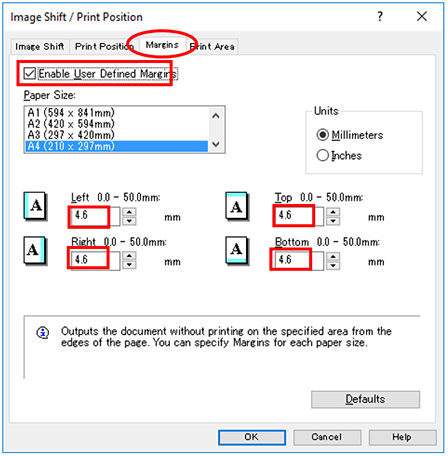
- Click the [Margins] tab in the [Image Shift/Print Position] dialog.
- If the margin was not specified or the top/bottom/right/left margins are set to 4.1 mm or less, switch on the [Enable User Defined Margins] checkbox and change the margin setting values to 4.2 mm or more.

- Close the [Print Margins] dialog by clicking the [OK] button in the dialog.
- Close the [Printing Preferences] dialog by clicking the [OK] button in the dialog.
- Close the [Device and Printer] window.
Effects Caused by Workaround 2
When Workaround 2 is applied, the following effects may be caused on printing results.
- Text, figure, or image to be printed in the extended margin area cannot be output. For example, if the margin setting had not been changed and then the [Enable User Defined Margins] checkbox was switched on, the text, figure, or image positioned in the range between 4.1 mm and 4.6 mm from the top/bottom/right/left edge of paper cannot be output.
- One-line character number varies depending on application type and the line-feed position is also changed. With the change of line-feed position, page number of printing result may change.
- Printing result may be demagnified a little depending on application type.
How to Check the Version of Windows 10
[Setting]
- Click in order of [Start] button and [Settings] (gear-shaped).
- Click [System].
- Click [Version Information].
- Check [Version].
[Command]
- Enter [winver] on a keyboard in the input box on the right side of the [Start] button.
- Click the [winver] displayed in [Most Matching Retrieval Result].
- [Windows version information] is displayed. Check the version on the screen.
As of January 10, the main update programs provided for Windows 10 and their versions are listed below.
- Windows 10 Fall Creators Update (Version 1709) * Started providing in October 2017.
- Windows 10 Creators Update (Version 1703) * Started providing in April 2017.
- Windows 10 Anniversary Update (Version 1607) * Started providing in August 2016.
- Windows 10 November update (Version 1511) * Started providing in November 2015.
- All services and product names mentioned are the registered trademarks or trademarks of the respective companies.